Sunday, November 30, 2008

Thanksgiving Twofer Pie (TWD)


Apologies for being so out of pocket lately. Life has gotten in the way of my blog. Work and home life has been extraordinarily hectic this month, and things have been pretty chaotic all around.

The hubby and I did have an opportunity to escape for a bit R&R this past week with our ritual Thanksgiving week trek to Las Vegas. Relaxing in Vegas sounds a bit odd, but the combination of gambling (love blackjack and craps!!), great restaurants, nice spas, and excellent shopping does a lot for a positive attitude adjusment, and all is well in my world again.

The Tuesdays With Dorie gang was given the option of posting this week's recipe after the Thanksgiving holiday (and thus my posting this on Sunday). I was very grateful for the repreive, as there was no way that I was going to make it earlier this week.

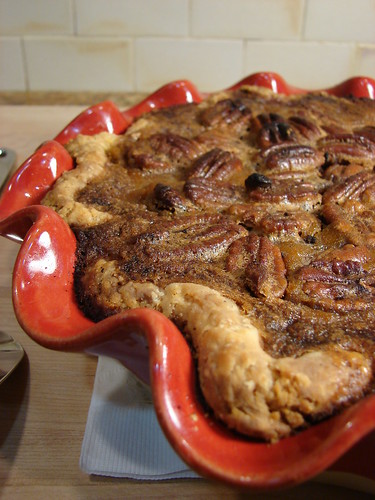
Selected by the lovely Vibi of La Casserole Carree, Thanksgiving Twofer Pie was a perfect selection for the season. Part pumpkin, part pecan, this recipe merges these two Thanksgiving favorites into one pie. This recipe starts with Dorie Greenspan's Good for Almost Everything Pie Dough, which is my all time favorite pie crust recipe:


For whatever reason, I expected this pie to have a layer of pumpkin filling on the bottom and a gooey pecan layer on top (did anyone get two distinct layers?). Instead, I ended up with a pumpkin pie with nuts studded on the top:
My hubby and I love pumkpin pie and dislike pecan pie, so we were both a little unsure about the marriage of these two fillings. So, what did we think?
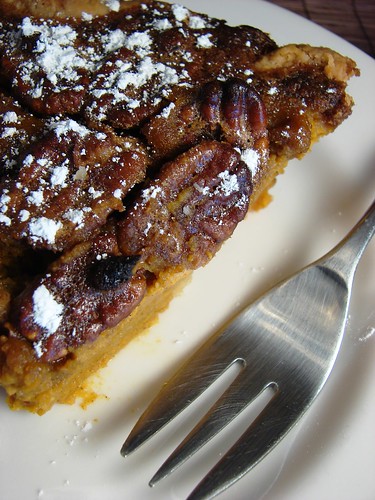
Bottom line, we both agreed that we like our pumpkin pie unadorned with nuts, so the pecans didn't do it for us. Also, the pumpkin filling fell a little flat on flavor (it needed more spice, molasses, maple syrup - something). I liked Dorie Greenspan's inspiration and intent with the recipe, but I'm going to stick with my tried and true pumpkin pie recipe. As I now owe my hubby (in his words) "a real pumpkin pie", I'll share the recipe w. pictures in the next couple of weeks.

For the recipe, you can find it at Vibi's site. To see the pie making talents of 350+ TWD bakers, check out the blogroll.

Thursday, November 20, 2008

Sweet Potato Cake w. Orange Filling and Chocolate Frosting (TCS)

This is my second post for The Cake Slice, which is a lovely group that is baking its way through Sky High: Irresistible Triple-Layer Cakes by Alisa Huntsman and Peter Wynne. Baking through this book has been treat, as it gives me an excuse every month to make delicious, interesting and ginormous triple layer cakes (DH and my work colleagues get to benefit from the sweet windfall of my baking endeavors).

This month’s recipe for The Cake Slice bakers is Sweet Potato Cake. Now, I’ve had sweet potato pie, but sweet potato in a cake? This would be a first for me. I was intrigued by the combination of sweet potato, spices, orange and chocolate flavors, and was very curious to see how this would all come together.

The cake, filling and frosting were a breeze to prepare (adjustments I made are highlighted in parentheses). The resulting cake was extremely delicious and it was impossibly moist --- YUM! I didn’t get much of a sweet potato flavor from the cake, as the predominant flavors came from the spices.

I did enjoy the orange filling, as it provided a nice complement to the spices and chocolate flavors. The frosting was your typical cream cheese frosting, with the addition of some melted chocolate. I cut back on the powdered sugar, and it was still a bit too sweet for my taste --- I think I’m going to cut the powdered sugar down by half the next time around…and there will definitely be a next time for this recipe!

To see beautiful and delicious versions of this recipe, check out The Cake Slice Bakers blogroll.


~~~~~~~~~~~~~~~~~~~~~~~~~~~~~~~~~~~

Sweet Potato Cake
From Sky High: Irresistible Triple-Layer Cakes by Alisa Huntsman and Peter Wynne (pp 178-181)
Makes a 9-inch triple layer cake, serves 16-20 people


Cake:
2 medium or 1 large sweet potato (12 ounces)
3 cups of cake flour
3 teaspoons of baking powder
1 and 1/2 teaspoons of ground cinnamon
3/4 teaspoon of ground nutmeg
1/4 teaspoon of cloves
5 eggs, separated
2 and 1/4 cups of sugar
1 stick plus 2 tablespoons of butter, at room temperature
1 and 1/2 teaspoons of vanilla
1 and 1/4 cups of milk

1. Preheat the oven to 400F degrees. Prick the sweet potatoes in 2-3 places, place on a small baking dish and bake for 1 hour or until the potatoes are very soft. Remove from the oven and cool slightly. (I baked the sweet potatoes the day before and kept them in the fridge)

2. Reduce the oven temperature to 350F degrees. Butter the bottoms and the sides of the pans and line with parchment paper. Butter the parchment paper also.

3. When the sweet potatoes are cool peel off the skin and remove any dark spots. Cut the potatoes into chunks and puree in a food processors. Puree until smooth. Measure out one cup of potato puree and set aside. (I skipped pureeing in the FP; instead I whipped the potatoes in the stand mixer using a paddle attachment, and then added the rest of the ingredients as written)

4. Sift the flour, baking powder, cinnamon, nutmeg, and ground cloves. Set aside.

5. In the bowl of electric mixer add the egg whites and attach whip attachment. Beat on medium speed until egg whites are frothy. Raise the speed to high and gradually beat in 1/4 cup of sugar. Continue to beat until the egg whites are moderately stiff.

6. In another large bowl with the paddle attachment, combine the sweet potato, butter, vanilla, and remaining sugar. Beat until light and fluffy. Add the egg yolks one at a time. Make sure to scrape the sides of the bowl after each egg yolk is added. With the mixer on low speed, add the dry ingredients and milk in alternately in 2-3 additions making sure to begin and end with the dry ingredients.

7. With a large spatula, fold in one fourth of the egg whites into the batter to lighten. Then fold in the remaining egg whites until no streaks remain. Making sure to not over mix or this will deflate the batter. Divide the batter among of the three pans.

8. Bake for 25-30 minutes or until a cake tester comes out clean. Let the cake layers cool in the pan for 10 minutes. Then turn out the cake layers onto a wire rack and cool completely at least 1 hour.

9. To assemble the cake, place one layer flat side up on to a cake stand. With a pastry bag fitted with a 1/2 inch round tip and filled with chocolate cream cheese icing, pipe border around the edge of the cake. Fill the center with the orange cream filling smoothing it to the edge of the border. Place the second layer on top and repeat the process. Place the third layer on top and use all the chocolate cream cheese frosting to cover the top and sides of the cake.

Chocolate Cream Frosting
makes 3 cups

10 ounces cream cheese at room temperature
1 stick of butter at room temperature
16 ounces of powdered sugar; sifted (decreased to 12 ounces)
1 and 1/2 ounces of unsweetened chocolate melted and slightly cooled (increased to 3 ounces)

1. In a large mixing bowl, beat together the cream cheese and butter until fluffy. Slowly add the powdered sugar to cream cheese butter mixture making sure to scrape down the sides the sides of the bowl. Then beat until light fluffy 2-3 minutes.

2. Measure out 1 cup of frosting and set aside.

3. Add the melted chocolate to the remaining icing in the bowl and beat until well combined.

Orange Cream Filling

1 cup of reserved cream cheese icing from above
2 tablespoons of frozen orange juice concentrate, thawed
1/4 teaspoon of orange extract (omitted)

1. Stir together all the ingredients until well mixed.

Tuesday, November 18, 2008

Arborio Rice Pudding - Chocolate & Chai (TWD)

Rice pudding is on the menu for this week’s Tuesdays With Dorie. I was looking forward to making this recipe, selected by Isabelle of Les gourmandises d’Isa. Rice pudding is the epitome of comfort food, and for me it is best eaten when curled up on the couch with my favorite blanket and catching up on TIVO (Top Chef, House, Grey’s Anatomy marathon, anyone?).

The recipe itself is pretty simple and straightforward. I noted a couple of major differences between this recipe and others that I’ve tried: (1) parboiling the rice first and (2) no eggs. I decided to follow the recipe as written too see how things would turn out. For flavor, I added a cinnamon stick (broken in two) to the mixture.

Dorie Greenspan personally reached out to the TWD group to highlight a correction on the recipe, which is to cook the pudding for 45-55 minutes (not the 30 minutes noted in the book). Even after cooking over a low heat for one hour, the pudding mixture barely thickened (could I have parboiled for too long, stripping the starch out of the rice?).

After taking the pudding off the stove, I divided the pudding into two containers and flavored one with 2 oz bittersweet chocolate (it melted into the still hot pudding beautifully) and the other with vanilla extract and chai spices (cinnamon, cardamom, cloves, ginger).

The chocolate version thickened nicely overnight. I couldn’t say the same for the chai version as it was still watery and soupy (blech!). I ended up reheating that portion, tempered in one egg and cooked it for a few minutes, allowing the mixture to thicken. After re-cooling and refrigerating, I finally got the thick, creamy texture that I was looking for.

Taste-wise, I thought that both versions were quite delicious. I was particularly really happy with the chocolate version, as for whatever reason chocolate in rice pudding didn’t really excite me.

I liked the simplicity of this recipe (and would make a mental note to temper in two eggs for the full recipe), but I don’t think this will trump my go-to rice pudding recipe. For the recipe, please check out Isabelle’s charming site. To see rice pudding by the hundreds, check out the TWD blogroll.

Tuesday, November 4, 2008

Rugelach Trio (TWD)

After two glorious weeks road tripping through NorCal, it is so good to be home!!! Now, don't get me wrong --- vacation was a total blast, but there is something to be said for the comforts of home i.e. to sleep in my own comfy bed!!! :)
Now, back to the business of baking! Rugelach is this week's Tuesdays With Dorie pick, selected by Grace of Piggy's Cooking Journal.

I'll admit that I've attempted to make rugelah once a few years back, and it was a total disaster! I ended up with a sticky/messy dough, misshapen cookies, and burnt filling that oozed out of the cookie. Dorie Greenspan's recipes rarely fail, so I entrusted in her rugelach recipe to redeem myself. I followed the dough recipe exactly as written, and made three different fillings:

raspberry jam, mini chocolate chips, and pecans

Nutella & Heath toffee bits

blueberry jam, dried blueberries, white chocolate and almonds

Yipeee!!! This recipe worked like a charm! As I made the rugelach this time around, I've learned a couple of things:

1. freeze the shaped cookies before baking to retain their shape
2. use restraint with the filling...a little goes a long way!

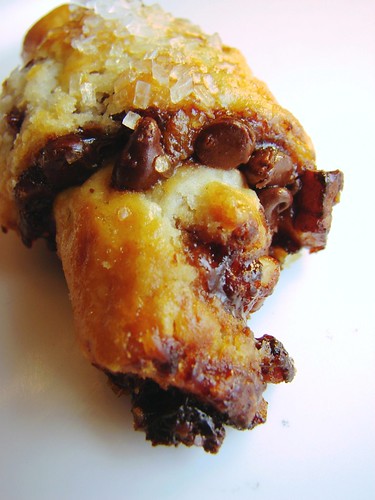
I was really pleased with this recipe, and as a bonus it was really quick and easy to assemble. All three of the fillings were delicious, but I would have to say that Dorie's suggestion of the jam, chocolate chips & pecans was my favorite. This is definitely going be part of my cookie baking rotation from this point on!

If you'd like this recipe, go to Grace's blog or Dorie Greenspan's blog (it also includes some great rugelach pointers). To see other creative versions of this delicious recipe, make sure to peruse the TWD blogroll.

Blog Widget by LinkWithin