Let's talk about rolling up my sleeves for my very first Daring Bakers challenge! For me, my goal in joining this fabulous baking group is to work with recipes that are typically out of my comfort zone. I was thrilled to see Danish Braid as this month's selection! I'll admit that I am the type to read these more complicated recipes, admire the pretty pictures, and make some excuse to not make the recipe. Now, I don't have an excuse! :)
Like making croissants and puff pastry, laminated dough is a time and labor intensive exercise. The first time I made croissants and puff pastry was in a pastry class this past winter, and I had to make both doughs one handed (I had broken my wrist a few weeks prior, so was in a cast....I finished a sweaty, floury mess, but the final baked items turned out pretty good! :)) I was happy to dive into this recipe...two handed!
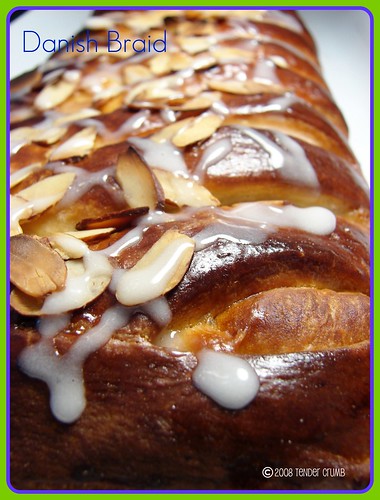
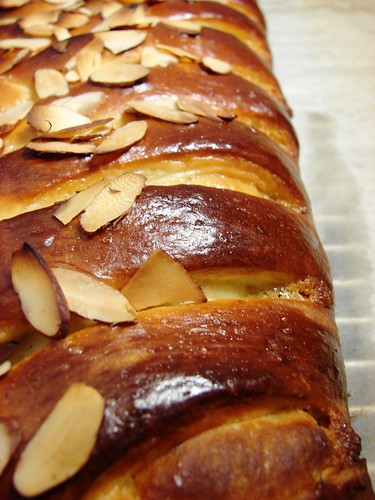
 The trick is allocating enough time for the turns, resting and proofing. I started the dough Friday evening (the bonus is cooling temps to work with the dough) , finishing all four turns and preparing the filling before turning in for the evening. The next morning, I assembled the braid and baked it off. The beautiful thing about this recipe is that your hard work is rewarded with a GORGEOUS looking pastry that tastes better than anything you would find at the corner bakery.
 This recipe yielded enough dough for two braids. Instead of making a second braid, I opted to make some smaller pastries.
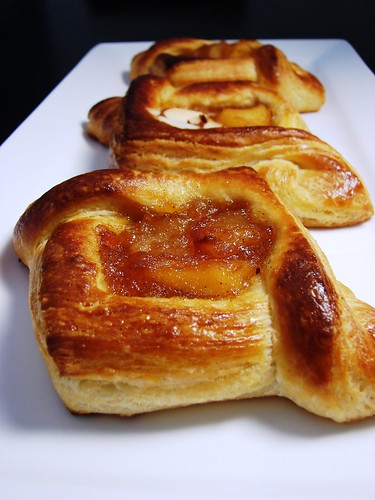
  With some of the dough, I made triangle twists and used the leftover apple mixture as the filling. I really love the beautiful shape, and the best part was that it was very easy to assemble!
 I also made bear claws, which was filled with a traditional remonce (almond filling)--- recipe is at the very end of this post). This was my absolute favorite pastry. The smell of the almond filling baking in the oven was intoxicating, and the pastry was light, fluffy and delicious.
~~~~~~~~~~~~~~~~~~~~~~~~~~~~~~
DANISH DOUGH
Makes 2-1/2 pounds dough
Ingredients
For the dough (Detrempe)
1 ounce fresh yeast or 1 tablespoon active dry yeast
1/2 cup whole milk
1/3 cup sugar
zest of 1 orange, finely grated
3/4 teaspoon ground cardamom
1-1/2 teaspoons vanilla extract
1/2 vanilla bean, split and scraped
2 large eggs, chilled
1/4 cup fresh orange juice
3 1/4 cups all-purpose flour
1 teaspoon salt
For the butter block (Beurrage)
1/2 pound (2 sticks) cold unsalted butter
1/4 cup all-purpose flour
DOUGH
- Combine yeast and milk in the bowl of a mixer fitted with the paddle attachment and mix on low speed. Slowly add sugar, orange zest, cardamom, vanilla extract, vanilla seeds, eggs, and orange juice. Mix well.
- Change to the dough hook and add the salt with the flour, 1 cup at a time, increasing speed to medium as the flour is incorporated. Knead the dough for about 5 minutes, or until smooth. You may need to add a little more flour if it is sticky.
- Transfer dough to a lightly floured baking sheet and cover with plastic wrap. Refrigerate for 30 minutes.
(Without a standing mixer: Combine yeast and milk in a bowl with a hand mixer on low speed or a whisk. Add sugar, orange zest, cardamom, vanilla extract, vanilla seeds, eggs, and orange juice and mix well. Sift flour and salt on your working surface and make a fountain. Make sure that the “walls” of your fountain are thick and even. Pour the liquid in the middle of the fountain. With your fingertips, mix the liquid and the flour starting from the middle of the fountain, slowly working towards the edges. When the ingredients have been incorporated start kneading the dough with the heel of your hands until it becomes smooth and easy to work with, around 5 to 7 minutes. You might need to add more flour if the dough is sticky.)
BUTTER BLOCK
- Combine butter and flour in the bowl of a mixer fitted with a paddle attachment and beat on medium speed for 1 minute. Scrape down the sides of the bowl and the paddle and then beat for 1 minute more, or until smooth and lump free. Set aside at room temperature.
- After the detrempe has chilled 30 minutes, turn it out onto a lightly floured surface. Roll the dough into a rectangle approximately 18 x 13 inches and ¼ inch thick. The dough may be sticky, so keep dusting it lightly with flour. Spread the butter evenly over the center and right thirds of the dough. Fold the left edge of the detrempe to the right, covering half of the butter. Fold the right third of the rectangle over the center third. The first turn has now been completed. Mark the dough by poking it with your finger to keep track of your turns, or use a sticky and keep a tally. Place the dough on a baking sheet, wrap it in plastic wrap, and refrigerate for 30 minutes.
- Place the dough lengthwise on a floured work surface. The open ends should be to your right and left. Roll the dough into another approximately 13 x 18 inch, ¼-inch-thick rectangle. Again, fold the left third of the rectangle over the center third and the right third over the center third. No additional butter will be added as it is already in the dough. The second turn has now been completed. Refrigerate the dough for 30 minutes.4. Roll out, turn, and refrigerate the dough two more times, for a total of four single turns. Make sure you are keeping track of your turns. Refrigerate the dough after the final turn for at least 5 hours or overnight. The Danish dough is now ready to be used. If you will not be using the dough within 24 hours, freeze it. To do this, roll the dough out to about 1 inch in thickness, wrap tightly in plastic wrap, and freeze. Defrost the dough slowly in the refrigerator for easiest handling. Danish dough will keep in the freezer for up to 1 month.
APPLE FILLING
Makes enough for two braids
Ingredients
4 Fuji or other apples, peeled, cored, and cut into ¼-inch pieces
1/2 cup sugar
1 tsp. ground cinnamon
1/2 vanilla bean, split and scraped
1/4 cup fresh lemon juice
4 tablespoons unsalted butter
Toss all ingredients except butter in a large bowl. Melt the butter in a sauté pan over medium heat until slightly nutty in color, about 6 - 8 minutes. Then add the apple mixture and sauté until apples are softened and caramelized, 10 to 15 minutes. If you’ve chosen Fujis, the apples will be caramelized, but have still retained their shape. Pour the cooked apples onto a baking sheet to cool completely before forming the braid. (If making ahead, cool to room temperature, seal, and refrigerate.) They will cool faster when spread in a thin layer over the surface of the sheet. After they have cooled, the filling can be stored in the refrigerator for up to 3 days. Left over filling can be used as an ice cream topping, for muffins, cheesecake, or other pastries.
DANISH BRAID
Makes enough for 2 large braids
Ingredients
1 recipe Danish Dough (see above)
2 cups apple filling, jam, or preserves (see above)
egg wash (1 large egg, plus 1 large egg yolk)
- Line a baking sheet with a silicone mat or parchment paper. On a lightly floured surface, roll the Danish Dough into a 15 x 20-inch rectangle, ¼ inch thick. If the dough seems elastic and shrinks back when rolled, let it rest for a few minutes, then roll again. Place the dough on the baking sheet.
- Along one long side of the pastry make parallel, 5-inch-long cuts with a knife or rolling pastry wheel, each about 1 inch apart. Repeat on the opposite side, making sure to line up the cuts with those you’ve already made.
- Spoon the filling you’ve chosen to fill your braid down the center of the rectangle. Starting with the top and bottom “flaps”, fold the top flap down over the filling to cover. Next, fold the bottom “flap” up to cover filling. This helps keep the braid neat and helps to hold in the filling. Now begin folding the cut side strips of dough over the filling, alternating first left, then right, left, right, until finished. Trim any excess dough and tuck in the ends.
- Egg Wash: Whisk together the whole egg and yolk in a bowl and with a pastry brush, lightly coat the braid.
Proofing and Baking
- Spray cooking oil onto a piece of plastic wrap, and place over the braid.
- Proof at room temperature or, if possible, in a controlled 90 degree F environment for about 2 hours, or until doubled in volume and light to the touch.
- Near the end of proofing, preheat oven to 400 degrees F. Position a rack in the center of the oven.3. Bake for 10 minutes, then rotate the pan so that the side of the braid previously in the back of the oven is now in the front. Lower the oven temperature to 350 degrees F, and bake about 15-20 minutes more, or until golden brown.
- Cool and serve the braid either still warm from the oven or at room temperature. The cooled braid can be wrapped airtight and stored in the refrigerator for up to 2 days, or freeze for 1 month.
~~~~~~~~~~~~~~~~~~~~~~~~~~~~~~~~~~~~~~~
Remonce (Almond Cream Filling)
Adapted from The Pie and Pastry Bible by Rose Levy Beranbaum
Ingredients
3 tbsp almond paste
1/4 C + 1 1/2 tsp sugar
4 tbsp butter
1 egg, room temp and slightly beaten
1/2 tsp vanilla
1 tbsp + 1 1/2 tsp flour
In a food processor, pulse together the almond paste and sugar until it looks like wet sand. Add butter and pulse 3-4 times until incorporated. Add the egg, vanilla, and flour and pulse just until incorporated. It will be a soft cream. Place in a piping bag and refrigerated until it is used (otherwise it may ooze from the pastry when baking)
 What a crappy week... I came down with a nasty case of food poisoning (sorry...TMI), and have been out of commission all week. I've been living on saltine crackers and gatorade, and my taste buds have been completely obliterated...ugh!!