Showing posts with label apple. Show all posts

Tuesday, May 18, 2010

Apple-Apple Bread Pudding (TWD)

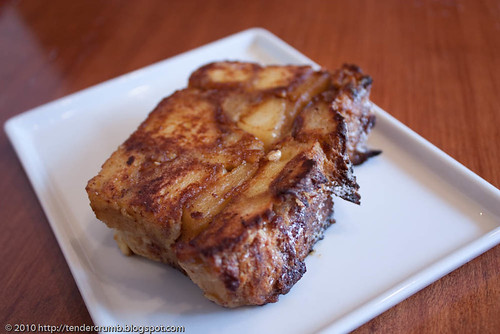
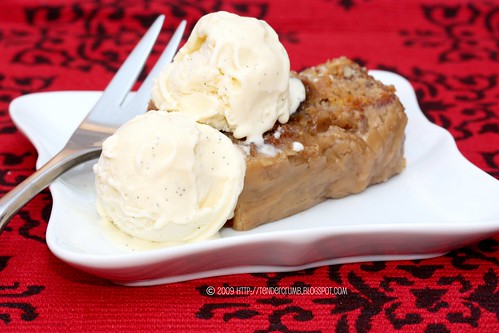
This week's Tuesdays With Dorie recipe for Apple-Apple Bread Pudding is all about comfort food that warms your tummy. This recipe takes a traditional bread pudding and adds a double dose of apples - sauted sliced apples and apple butter.
I did take some liberties with this recipe (you can find the complete original recipe at Liz's terrific blog, Cake or Death? ):

- I halved the recipe to accommodate a 8x3 loaf pan.

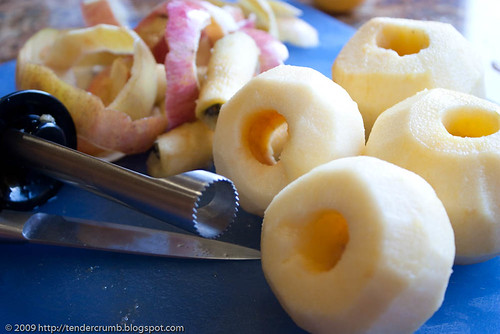
- Challah was my bread of choice. The bread was cut into thick slices, liberally slathered with apple butter, and then cut into cubes.

- 1/2 tsp of cinnamon was added to the custard mixture.

- Baking time was adjusted to 1 hour

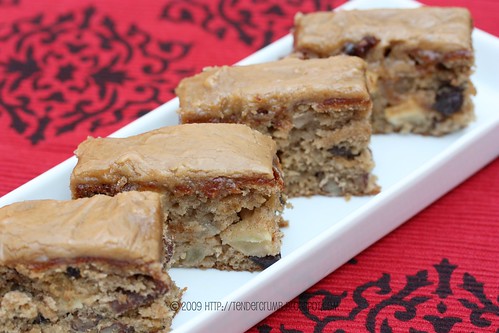
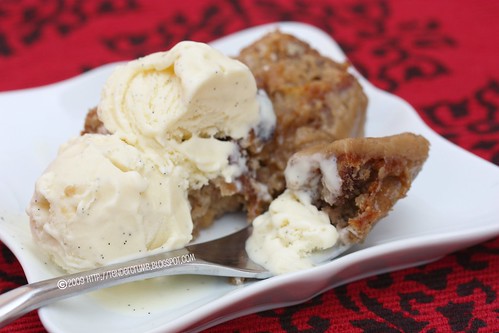
- Once out of the oven, I let the bread pudding cool to room temp. After unmolding from the pan, the bread pudding is sliced, and these slices are fried on both sides with a generous amount of butter (just like frying up french toast). Sure, this is a total fat bomb but boy o' boy is it delicious! Frying creates a beautiful crust, and its slight crunchy exterior gives in to the soft, rich interior. Although the fruit is no longer distinguishable, the apple flavor definitely shines. A little dusting of powdered sugar and a scoop of vanilla ice cream is all you need to complete this dessert.

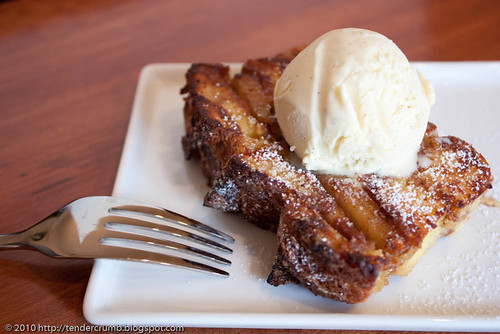
Thank you Liz for this super delicious selection!

Tuesday, January 5, 2010

Tarte Tatin - Happy 2nd Anniversary TWD!!!!

Happy 2nd Anniversary to Tuesdays With Dorie! Who would have guessed that after two years that TWD would be going strong with 300+ bakers and with 95+ completed recipes from Dorie Greenspan's fabulous cookbook Baking: From My Home To Yours. Even more surprising to me has been my own commitment to bake and to post weekly on my ole blog (you see, I'm a huge flake when it comes to my personal hobbies). Pastry has always been a passion of mine, and it's been a gratifying experience to bake and share with so many groovy people in the blog-o-sphere. I'm looking forward to another sweet year of delicious baking in 2010!

To mark this auspicious occasion, the TWD group went the democratic route and voted on a recipe. After the votes were tallied, we were given a choice of Tarte Tatin or Cocoa Buttermilk Cake (or both, for some ambitious bakers). I've never made a Tarte Tatin before, so I was looking forward to making my first.

After reading over the recipe, I eyeballed the short ingredient list and noted that most of the prep and baking is done in a single tatin pan or skillet. I'm already loving this recipe! I opted to make a mini tarte tatin, halving the recipe and using a 6 inch cast iron skillet.

Peel and core the apples (I used Fuji)...
Melt butter in the pan, add sugar, then take off the heat. Arrange the apples decoratively in the pan, then cook on the stovetop until the butter/sugar mixture caramelizes.

Once caramelized, its time to set the pan on a baking sheet and seal with a crust of some sort. This skillet was HOT! Check out the bubbling brown butter/sugar goodness...
Seal the fruit with a crust. The recipe is pretty flexible giving puff pastry, pie crust or tart crust as options. I went with a pie crust...
Once the tarte is baked and nicely browned in the oven (my mini version only took 20 minutes), remove from the oven. Silpat was an essential kitchen tool, as the caramel created a sticky burnt mess...
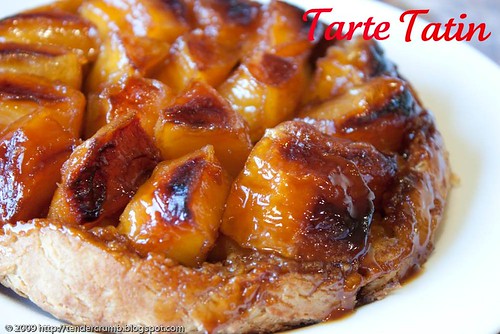
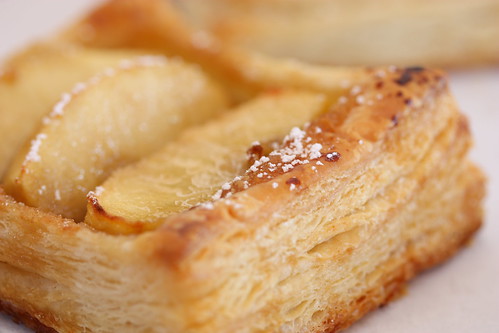
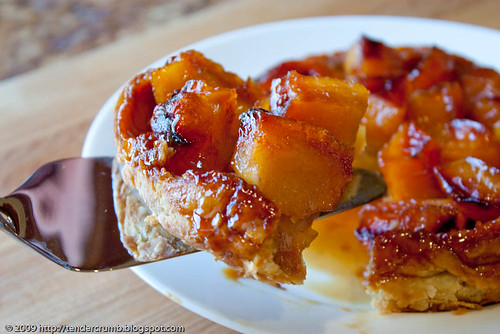
No time to wait. It's time to flip the tarte out of the pan to see what lies beneath. Drumroll please...
Yipeee...tarte tatin success!
The delicious smell of this tarte had Siena hanging out in the kitchen. Sorry girl, this tarte is for the hubs and me...
If you're a tarte tatin neophyte like me, you have to give this classic recipe a try. Click here for the complete recipe. It isn't that difficult to make, and you will be rewarded with a gorgeous dessert. Next time, I can't wait to make and serve a full size version to dinner guests...or just for me.

Friday, November 27, 2009

All In One Holiday Bundt (TWD)


So, we had to cope with our derailed Thanksgiving travel plans. The hubs and I went through a momentary (okay, it was a bit more like a few hours) whiny, pity party phase, and now we've moved on. We decided to make the proverbial lemons into lemonade, and are making good use of our new found time.

The hubs has been a whirling dervish as he's already cleaned the garage, dug out the Christmas boxes, and hung the holiday lights. WooHoo hubs!!! I've been organizing paperwork for next year's tax returns, decking the house with holiday stuff, scouring cookbooks for this year's holiday treat boxes, and taking inventory of the gifts that we've been stockpiling throughout the year. I hope I'm not jinxing ourselves by saying this, but I think we're actually ready for the holidays!

BTW, Siena is doing much better. The first 24 hours was tough on the little girl, but she pulled through just fine (and the vet confirmed that she didn't ingest anything poisonous). She's back to her old exuberant self!
With this gift of time, I took the opportunity to catch up on some baking that I've been postponing. This is a late TWD post for All-In-One Holiday Bundt. I almost skipped this recipe due to lack of time, and I am so glad that I didn't pass this recipe.

The list of ingredients is definitely representative of the holidays: pumpkin, apple, cranberry, cinnamon, ginger, and nutmeg.
I halved the recipe, which yielded the perfect amount for a six cup bundt pan. The original recipe calls for a cup of chopped pecans, which I decided to omit. Instead, I substituted the nuts with an additional 1/4 cup each of cranberries and apple (I used granny smith). I was too lazy to dice, so I shredded the apple instead (just watch your fingers!).
The baking time for this smaller bundt was approximately 40-45 minutes. The smell of this cake baking in the oven was heavenly!
Once out of the oven and cooled, I opted to drizzle maple icing to finish the cake.
When I first read through the recipe, I thought this could be a case of "too much of a good thing" with all of these ingredients competing with each other. Instead, I was really pleased by the flavors: the tartness of the cranberry and apple was nicely balanced by the sweetness of the pumpkin and maple icing. The spices are definitely present, but doesn't overwhelm the fruit flavors in the cake.
Aside from the delicious flavor, this cake is super moist and will keep for a few days (if it isn't gobbled up before then).
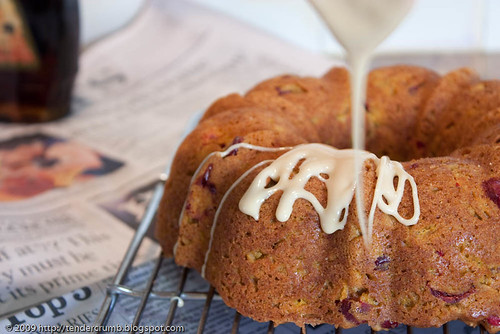
Thank you Britin of The Nitty Britty for this delicious Tuesdays With Dorie selection. For the complete recipe, you can find it either at Dorie Greenspan's column at Serious Eats or at Britin's blog.

Tuesday, November 17, 2009

Cran-Apple Crisps (TWD)


As a thin-blooded native Californian, I was reaching for my fuzzy slippers and huddling under a flannel blanket last night as the temperature dipped into the 40's. Okay...you can stop laughing at my weather wimpiness, as I get enough mocking at home courtesy of my hubs. As a New Jersey native, he thought last night's temperature was "refreshingly crisp" and sat next to his shivering wife wearing a t-shirt and shorts.

The hubs and I will forever disagree about how we define cold weather, but we both agreed that this warm Cran-Apple Crisp was the perfect sweet ending to our evening meal. With a short and sweet ingredient list, this recipe can be assembled in a flash. I used a combination of winesap and orin apples that came from Ha's Apple Farm.

For those of you who are SoCal based, I highly recommend that you visit Mr. Ha's stand at your local farmers market (I've seen his stands in Hollywood and Santa Monica). He offers a fantastic variety of apples and they are all super delicious - his fujis are da bomb!Don't be shy about piling a generous amount of the cinnamon ginger crisp topping into the ramekins. Once they are baked, the ingredients settle into a sweet mass of warm and spice-scented deliciousness...
A scoop of vanilla ice cream is an absolute must for this dessert...
Overall, I thought this crisp was yummy! As the crisp topping is sweet, I didn't think the fruit base needed too much additional sugar, so will make a note to dial down the sugar quantity in the fruit mixture. As the apples I used were not overly juicy, I halved the amount of flour called for in the recipe, and the crisp didn't get soggy... it was perfect!

I had quite a bit of crisp topping leftover, and used it the next day as a delicious and not-so-heathly mix-in for my morning oatmeal.

Thanks Em of The Repressed Pastry Chef for this delicious TWD selection. Please visit Em's blog for the complete recipe.

Tuesday, August 18, 2009

Applesauce Spice Bars (TWD)


This week's Tuesdays With Dorie recipe for Applesauce Spice Bars are technically bar cookies, but as you can see in these photos, mine turned out thick and cake-like.

The reason - I totally misread the pan requirements and used a smaller 8"x8" pan (versus a 9"x13" pan called for in the recipe). Aside from the pan snafu, I did follow the recipe with the following notes (for the full recipe, please visit Something Sweet by Karen):

- increased baking time to 35 minutes
- used a Granny Smith apple
- doubled the amount of cinnamon and allspice
- soaked the dark raisins in rum (it really helped plump and rehydrate them)
- in addition to soaking the raisins in rum, I opted to add 1 tbsp of dark rum into the batter
- doubled the brown sugar glaze recipe. Instead of pouring the hot glaze over the cake, I let the glaze cool. At room temp the glaze was much thicker, and this was spread like frosting over the cake.
I loved how soft and moist this bar turned out, and I'm glad that I added the raisin and pecans, as it gave it some textural interest. I loved the flavors of cinnamon and allspice, and they went wonderfully with the apples.

My only minor issue with this recipe was the sweetness --- it was really too sweet for my personal taste, which I think was contributed by the glaze.
Still, this bar didn't go to waste at my house, as we enjoyed it a la mode with Dorie Greenspan's Vanilla Ice Cream.
There are a lot of things that I liked about this recipe, and I'm definitely going to give it another try with a couple of adjustments (ie. omitting the glaze and using the proper pan).

Thanks Karen of Something Sweet by Karen for a terrific selection this week. Karen is always cooking and baking delicious treats which she shares through her beautiful blog.

I can't believe I'm actually writing this, but next week will be MY turn to host Tuesdays With Dorie. I'm looking forward to baking and visually feasting with all of you!

Tuesday, June 9, 2009

Parisian Tartlets (TWD)


The ingredient list for this week's Tuesdays With Dorie recipe: puff pastry, fruit, brown sugar, and butter. Who knew that this short and sweet ingredient list could create these beautiful and elegant tartlets!

As we're just jumping into the summer fruit season (yipeee!!!), I also used fresh cherries and peaches, along with apples that are called for in the original recipe (please visit My Baking Heart for the complete recipe)
Along with the 4 inch tartlets, I also made some bite-size baby tarts (cherries and donut peaches shown here):
Out of necessity, I made puff pastry from scratch, as Trader Joe's only carries their frozen puff pastry seasonally --- who knew that puff pastry went out of season!

The last time I made puff pastry was in my pro-baking class a year or so ago, and I literally made it one-handed as I was in a cast with a broken wrist (Mary Jo can bear witness to my one-armed fiasco!).

As you can imagine, the process this time around was a lot more pleasurable. In all honesty, puff pastry isn't all that difficult to make...it's scheduling the time to roll out the dough 4-5 times to get those beautiful flaky layers that makes the recipe a little tricky.

I ran out of time (apologies), so I owe all of you lovely TWD'ers a post on this puff pastry recipe, including process photos.
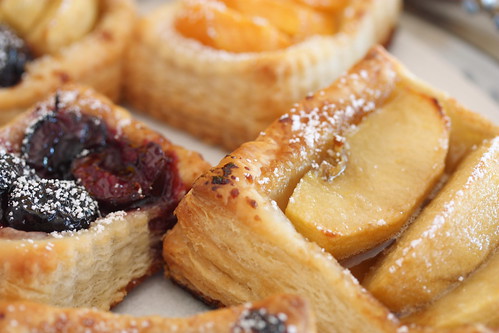
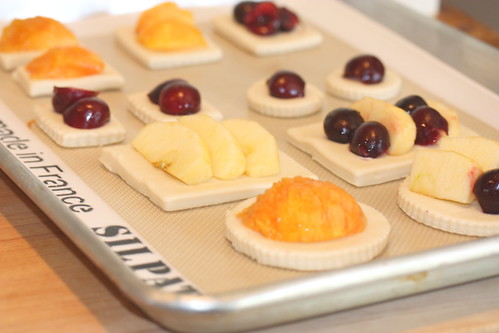
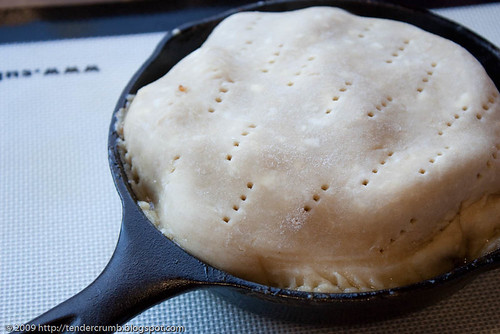
Roll out the dough, use a cutter (or a knife) to cut out the dough, top with fruit.
Sprinkle each tartlet with some brown sugar and dot with some butter. Pop them into the oven for 25 minutes (I only needed 20 minutes, as went a wee bit smaller for my tartlets) and voila! --- you are rewarded with a beautiful dessert!
Thanks to Jessica of My Baking Heart for a wonderful selection this week! Please make sure to make the rounds at the TWD blogroll.

Wednesday, May 27, 2009

Apple Strudel (DB)

This month's Daring Bakers Challenge is Apple Strudel, and I was definitely excited about this recipe, as I've never attempted making strudel. As a matter of fact, I don't think I've tasted homemade strudel... until now.

The ingredient list is pretty simple, but the challenge definitely comes in making and stretching the dough to create the impossibly thin and flaky layers. I definitely had my challenge in getting the dough paper thin, and didn't even come close to getting the dough stretched to the 2'x3' dimensions indicated in the recipe (mine fell a little short at 18"x 24"). Once the dough was prepped, I made a simplified version of the apple filling (no nuts, no raisins).

At the end of this baking exercise, my kitchen was an absolute disaster area, but the clean up was definitely worth the effort. Who knew how delicious homemade strudel could be! Thanks to Linda of Make Life Sweeter! and Courtney of Coco Cooks for selecting this challenging but delicious recipe.
APPLE STRUDEL
from “Kaffeehaus – Exquisite Desserts from the Classic Cafés of Vienna, Budapest and Prague” by Rick Rodgers

Apple Filling
2 tablespoons (30 ml) golden rum (omitted)
3 tablespoons (45 ml) raisins (omitted)
1/4 teaspoon ground cinnamon
1/3 cup plus 1 tablespoon (80 g) sugar
1/2 cup (1 stick / 115 g) unsalted butter, melted, divided
1 1/2 cups (350 ml) fresh bread crumbs
strudel dough (recipe below)
1/2 cup (120 ml, about 60 g) coarsely chopped walnuts (omitted)
2 pounds (900 g) tart cooking apples, peeled, cored and cut into ¼ inch-thick slices (use apples that hold their shape during baking)

1. Mix the rum and raisins in a bowl. Mix the cinnamon and sugar in another bowl.

2. Heat 3 tablespoons of the butter in a large skillet over medium-high. Add the breadcrumbs and cook whilst stirring until golden and toasted. This will take about 3 minutes. Let it cool completely.

3. Put the rack in the upper third of the oven and preheat the oven to 400°F (200°C). Line a large baking sheet with baking paper (parchment paper). Make the strudel dough as described below. Spread about 3 tablespoons of the remaining melted butter over the dough using your hands (a bristle brush could tear the dough, you could use a special feather pastry brush instead of your hands). Sprinkle the buttered dough with the bread crumbs. Spread the walnuts about 3 inches (8 cm) from the short edge of the dough in a 6-inch-(15cm)-wide strip. Mix the apples with the raisins (including the rum), and the cinnamon sugar. Spread the mixture over the walnuts.

4. Fold the short end of the dough onto the filling. Lift the tablecloth at the short end of the dough so that the strudel rolls onto itself. Transfer the strudel to the prepared baking sheet by lifting it. Curve it into a horseshoe to fit. Tuck the ends under the strudel. Brush the top with the remaining melted butter.

5. Bake the strudel for about 30 minutes or until it is deep golden brown. Cool for at least 30 minutes before slicing. Use a serrated knife and serve either warm or at room temperature. It is best on the day it is baked.

Strudel Dough
1 1/3 cups (200 g) unbleached flour
1/8 teaspoon salt
7 tablespoons (105 ml) water, plus more if needed
2 tablespoons (30 ml) vegetable oil, plus additional for coating the dough
1/2 teaspoon cider vinegar

1. Combine the flour and salt in a stand-mixer fitted with the paddle attachment. Mix the water, oil and vinegar in a measuring cup. Add the water/oil mixture to the flour with the mixer on low speed. You will get a soft dough. Make sure it is not too dry, add a little more water if necessary.
Take the dough out of the mixer. Change to the dough hook. Put the dough ball back in the mixer. Let the dough knead on medium until you get a soft dough ball with a somewhat rough surface.

2. Take the dough out of the mixer and continue kneading by hand on an unfloured work surface. Knead for about 2 minutes. Pick up the dough and throw it down hard onto your working surface occasionally.
Shape the dough into a ball and transfer it to a plate. Oil the top of the dough ball lightly. Cover the ball tightly with plastic wrap. Allow to stand for 30-90 minutes (longer is better).

3. It would be best if you have a work area that you can walk around on all sides like a 36 inch (90 cm) round table or a work surface of 23 x 38 inches (60 x 100 cm). Cover your working area with table cloth, dust it with flour and rub it into the fabric. Put your dough ball in the middle and roll it out as much as you can.
Pick the dough up by holding it by an edge. This way the weight of the dough and gravity can help stretching it as it hangs. Using the back of your hands to gently stretch and pull the dough. You can use your forearms to support it.

4. The dough will become too large to hold. Put it on your work surface. Leave the thicker edge of the dough to hang over the edge of the table. Place your hands underneath the dough and stretch and pull the dough thinner using the backs of your hands. Stretch and pull the dough until it's about 2 feet (60 cm) wide and 3 feet (90 cm) long, it will be tissue-thin by this time. Cut away the thick dough around the edges with scissors. The dough is now ready to be filled.
~~~~~~~~~~~~~~~~~~~~~~~~~~~~~~~~~~~~~~~~~~~~~~~~~~~~~~~~~~~~~~~~~~~~~~~~~~~~~~~~

The May Daring Bakers’ challenge was hosted by Linda of make life sweeter! and Courtney of Coco Cooks. They chose Apple Strudel from the recipe book Kaffeehaus: Exquisite Desserts from the Classic Cafés of Vienna, Budapest and Prague by Rick Rodgers.

Tuesday, July 1, 2008

Apple Cheddar Scones (TWD)

What a crappy week... I came down with a nasty case of food poisoning (sorry...TMI), and have been out of commission all week. I've been living on saltine crackers and gatorade, and my taste buds have been completely obliterated...ugh!!


Although still not feeling 100%, I wanted to try and get back into a normal routine this weekend. Being in the kitchen is a big part of that routine, so wanted to kick off my recovery with some baking! This week's Tuesdays With Dorie selection, Apple Cheddar Scones, which was made by Karina at The Floured Apron, would serve as a perfect start.

Dorie Greenspan considers this recipe for Apple Cheddar Scones as one of her favorites. I'm a huge fan of eating fruit and cheese together, with the saltiness and creaminess of the cheese complementing the juiciness and sweetness of fruit, so I can see where the appeal comes from.

I had almost all of the ingredients at home, with the exception of the dried apples and cheddar cheese. While shopping for the remaining ingredients at Trader Joe's, I was tempted to veer a bit from the recipe, as I spied packages of dried pears sitting beside the dried apples...doesn't pears and guyere sound yummy in this recipe? Ultimately, I decided to stick with the recipe as written, as I wanted to experience one of Dorie's favorite scones.


The recipe came together quickly, and I used a 2 1/2" biscuit cutter to portion the dough. This dough was much stickier than I expected, so had to flour my work surface well and work quickly. I ended up with 18 rounds (this includes using the scraps --- don't like wasting these lovely bits of dough).

These scones baked off much flatter that I expected. Then again, the scone picture accompanying the recipe was also pretty flat, so maybe this was intended. I really liked how the shredded cheese oozed out of the scones resulting with cheesy, crunchy bits on the crust (yum!). I also really like the textural contrast that the chewy dried apples delivered.

I still can't taste anything really well, so I'm relying on my hubby to give his impression on flavor. Per Mr. B: Overall, the salty sweet flavor combination of the cheese and apples was delicious and I would definitely look forward to eating them again soon...hint, hint ;)!

Thanks Karina for this delicious selection! For the recipe, please visit Karina's site, The Floured Apron. To see what the TWD gals and guys have been cookin' up, check out the Tuesday's With Dorie blogroll.

Blog Widget by LinkWithin