Tuesday, March 31, 2009

Coconut Butter Thins (TWD)

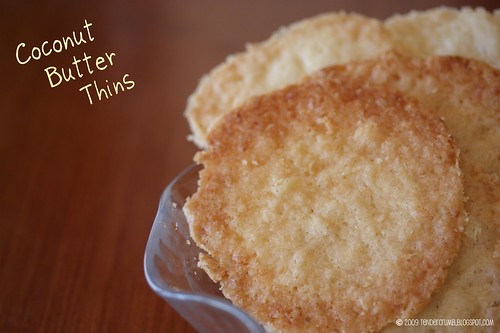
This week's Tuesdays With Dorie recipe is Coconut Butter Thins. The foundation of this cookie is a shortbread dough, which is embellished with coconut, macadamia, and lime zest. These components are not necessarily in my top 10 list of favorite ingredients/flavors, and I confess that I wasn't excited about making these cookies.
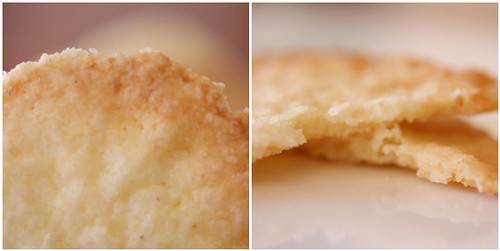
The instructions for this cookie are pretty straightforward, and for the most part I followed the recipe as written. My only minor adjustment was finely grinding the coconut along with the macadamias.

In the book, Dorie Greenspan describes these cookies as wafery and lacey. Even with that knowledge, I was surprised that my cookie dough squares spread like crazy in the oven! Either the spreading is intended, or else the overnight rest in the fridge and freezing the cut cookie dough didn't help the cookies retain its shape. Now, I'm curious to see how everyone else's cookies turned out.
So much for how they look...more importantly, how do they taste? After taking one bite of this cookie, I realized that I should keep an open mind --- these cookies are unbelievably flavorful and delicious!!!! The texture is a perfect balance of crispy and tender, and the coconut, macadamia and lime flavors are really wonderful together (I think next time I will increase the amount of lime zest --- loved the flavor). I will say that this gem is one of my favorite TWD recipes to date (and that's saying something, as the group has made some pretty terrific treats).

Thanks Jayne of The Barefoot Kitchen Witch for selecting this divine cookie! If you want to make this delicious cookie yourself, head over to Jayne's blog for the recipe. For more delicious cookies, check out the TWD blogroll.

Sunday, March 29, 2009

Lasagne of Emilia-Romagna (DB)

The Daring Bakers took a savory detour for March's challenge with lasagne. The focus of this month's challenge is making homemade pasta, which is a first for me. I've always wanted to experiment making pasta by hand, but have always found a convenient excuse to flake. Usually, my energy and effort are usually focused on the components that accompany the pasta (i.e. sauce).

This month's recipe (which you will find below) consists of three components: pasta verde, bechamel sauce, and a country style ragu.
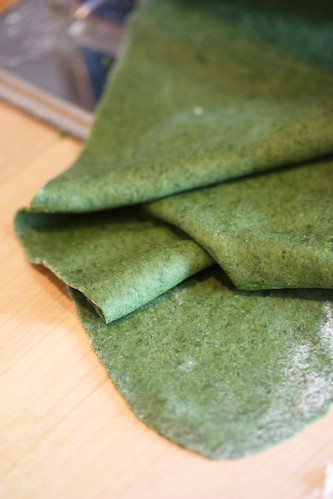
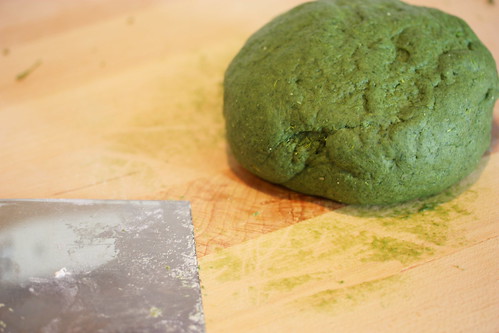
The dough is given a healthy amount of kneading (whew!), rested for a minimum of 30 minutes, then rolled out into sheets. We were given instructions to roll by hand using a rolling pin, and I can't imagine doing this by hand --- it's a serious workout for your arms! Instead, I pulled out my handy pasta machine for it's rare appearance. I've never made pasta with this contraption; instead, I've used to roll out cracker dough once every blue moon.
The pasta verde gets its vibrant green color from a healthy handful of spinach (I used frozen chopped spinach):
Being that I am such an accomplished procrastinator, I ended up making all the components, assembling and baking the lasagne in one afternoon. I would definitely NOT recommend this ---this is a pretty time consuming recipe.

I garnished the lasagne with a handful of basil leaves quickly fried in olive oil:
Boy, was the effort worth it! I love lasagne to begin with, but I definitely think that the homemade pasta really made a difference. This lasagne reminds me of a lasagne verde served at one of my favorite local Italian restaurants, Angelini Osteria. Now, I'm happy to know that I don't need to leave home to satisfy my lasagne craving.

Thanks to the hosts for this month's terrific and delicious challenge: Mary of Beans & Caviar, Melinda of Melbourne Larder and Enza of Io Da Grande. Make sure to check out The Daring Bakers blogroll for more delicious and creative versions of this recipe.
~~~~~~~~~~~~~~~~~~~~~~~~~~~~~~~~~~

Lasagne of Emilia-Romagna (Lasagne Verdi al Forno)

From The Splendid Table by Lynne Rossetto Kasper
Serves 8 to 10 as a first course, 6 to 8 as a main dish)
Preparation Time: 15 minutes to assemble and 40 minutes cooking time

10 quarts (9 litres) salted water
1 recipe Spinach Pasta cut for lasagna (recipe follows)#1
1 recipe Bechamel Sauce (recipe follows)#2
1 recipe Country Style Ragu (recipe follows)#3
1 cup (4 ounces/125g) freshly grated Parmigiano-Reggiano

Method

Working Ahead:
The ragu and the béchamel sauce can be made up to three days ahead. The ragu can also be frozen for up to one month. The pasta can be rolled out, cut and dried up to 24 hours before cooking. The assembled lasagne can wait at room temperature (20 degrees Celsius/68 degrees Fahrenheit) about 1 hour before baking. Do not refrigerate it before baking, as the topping of béchamel and cheese will overcook by the time the center is hot.

Assembling the Ingredients:
Have all the sauces, rewarmed gently over a medium heat, and the pasta at hand. Have a large perforated skimmer and a large bowl of cold water next to the stove. Spread a double thickness of paper towels over a large counter space. Preheat the oven to 350 degrees Fahrenheit (180 degrees Celsius). Oil or butter a 3 quart (approx 3 litre) shallow baking dish.

Cooking the Pasta:
Bring the salted water to a boil. Drop about four pieces of pasta in the water at a time. Cook about 2 minutes. If you are using dried pasta, cook about 4 minutes, taste, and cook longer if necessary. The pasta will continue cooking during baking, so make sure it is only barely tender. Lift the lasagne from the water with a skimmer, drain, and then slip into the bowl of cold water to stop cooking. When cool, lift out and dry on the paper towels. Repeat until all the pasta is cooked.

Assembling the Lasagne:
Spread a thin layer of béchamel over the bottom of the baking dish. Arrange a layer of about four overlapping sheets of pasta over the béchamel. Spread a thin layer of béchamel (about 3 or 4 spoonfuls) over the pasta, and then an equally thin layer of the ragu. Sprinkle with about 1&1/2 tablespoons of the béchamel and about 1/3 cup of the cheese. Repeat the layers until all ingredients are used, finishing with béchamel sauce and topping with a generous dusting of cheese.

Baking and Serving the Lasagne:
Cover the baking dish lightly with foil, taking care not to let it touch the top of the lasagne. Bake 40 minutes, or until almost heated through. Remove the foil and bake another 10 minutes, or until hot in the center (test by inserting a knife – if it comes out very warm, the dish is ready). Take care not to brown the cheese topping. It should be melted, creamy looking and barely tinged with a little gold. Turn off the oven, leave the door ajar and let the lasagne rest for about 10 minutes. Then serve. This is not a solid lasagne, but a moist one that slips a bit when it is cut and served.

#1 Spinach Egg Pasta (Pasta Verde)
Preparation: 45 minutes
Makes enough for 6 to 8 first course servings or 4 to 6 main course servings, equivalent to 1 pound (450g) dried boxed pasta.


2 jumbo eggs (2 ounces/60g or more)
10 ounces (300g) fresh spinach, rinsed dry, and finely chopped; or 6 ounces (170g) frozen chopped spinach, defrosted and squeezed dry
3&1/2 cups (14 ounces/400g) all purpose unbleached (plain) flour (organic stone ground preferred)

Working by Hand:

Equipment
- A roomy work surface, 24 to 30 inches deep by 30 to 36 inches (60cm to 77cm deep by 60cm to 92cm). Any smooth surface will do, but marble cools dough slightly, making it less flexible than desired.
- A pastry scraper and a small wooden spoon for blending the dough.
- A wooden dowel-style rolling pin. In Italy, pasta makers use one about 35 inches long and 2 inches thick (89cm long and 5cm thick). The shorter American-style pin with handles at either end can be used, but the longer it is, the easier it is to roll the pasta.
Note: although it is not traditional, Enza has successfully made pasta with a marble rolling pin, and this can be substituted for the wooden pin, if you have one.
- Plastic wrap to wrap the resting dough and to cover rolled-out pasta waiting to be filled. It protects the pasta from drying out too quickly.
- A sharp chef’s knife for cutting pasta sheets.
- Cloth-covered chair backs, broom handles, or specially designed pasta racks found in cookware shops for draping the pasta.

Mixing the dough:
Mound the flour in the center of your work surface and make a well in the middle. Add the eggs and spinach. Use a wooden spoon to beat together the eggs and spinach. Then gradually start incorporating shallow scrapings of flour from the sides of the well into the liquid. As you work more and more flour into the liquid, the well’s sides may collapse. Use a pastry scraper to keep the liquids from running off and to incorporate the last bits of flour into the dough. Don’t worry if it looks like a hopelessly rough and messy lump.

Kneading:
With the aid of the scraper to scoop up unruly pieces, start kneading the dough. Once it becomes a cohesive mass, use the scraper to remove any bits of hard flour on the work surface – these will make the dough lumpy. Knead the dough for about 3 minutes. Its consistency should be elastic and a little sticky. If it is too sticky to move easily, knead in a few more tablespoons of flour. Continue kneading about 10 minutes, or until the dough has become satiny, smooth, and very elastic. It will feel alive under your hands. Do not shortcut this step. Wrap the dough in plastic wrap, and let it relax at room temperature 30 minutes to 3 hours.

Stretching and Thinning:
If using an extra-long rolling pin work with half the dough at a time. With a regular-length rolling pin, roll out a quarter of the dough at a time and keep the rest of the dough wrapped. Lightly sprinkle a large work surface with flour. The idea is to stretch the dough rather than press down and push it. Shape it into a ball and begin rolling out to form a circle, frequently turning the disc of dough a quarter turn. As it thins outs, start rolling the disc back on the pin a quarter of the way toward the center and stretching it gently sideways by running the palms of your hands over the rolled-up dough from the center of the pin outward. Unroll, turn the disc a quarter turn, and repeat. Do twice more.

Stretch and even out the center of the disc by rolling the dough a quarter of the way back on the pin. Then gently push the rolling pin away from you with one hand while holding the sheet in place on the work surface with the other hand. Repeat three more times, turning the dough a quarter turn each time.

Repeat the two processes as the disc becomes larger and thinner. The goal is a sheet of even thickness. For lasagne, the sheet should be so thin that you can clearly see your hand through it and see colours. Cut into rectangles about 4 by 8 inches (10 x 20 cm). Note: Enza says that transparency is a crucial element of lasagne pasta and the dough should be rolled as thinly as possible. She says this is why her housekeeper has such strong arms!

Dry the pasta at room temperature and store in a sealed container or bag.

#2 Bechamel
Preparation Time: 15 minutes

4 tablespoons (2 ounces/60g) unsalted butter
4 tablespoons (2 ounces/60g) all purpose unbleached (plain) flour, organic stone ground preferred
2&2/3 cups (approx 570ml) milk
Salt and freshly ground pepper to taste
Freshly grated nutmeg to taste

Using a medium-sized saucepan, melt the butter over low to medium heat. Sift over the flour, whisk until smooth, and then stir (without stopping) for about 3 minutes.

Whisk in the milk a little at a time and keep the mixture smooth. Bring to a slow simmer, and stir 3 to 4 minutes, or until the sauce thickens.

Cook, stirring, for about 5 minutes, until the sauce thickens. Season with salt, pepper, and a hint of nutmeg.

#3 Country Style Ragu’ (Ragu alla Contadina)

Preparation Time: Ingredient Prep Time 30 minutes and Cooking time 2 hours
Makes enough sauce for 1 recipe fresh pasta or 1 pound/450g dried pasta)

3 tablespoons extra virgin olive oil (45 mL)
2 ounces/60g pancetta, finely chopped
1 medium onion, minced
1 medium stalk celery with leaves, minced
1 small carrot, minced
4 ounces/125g boneless veal shoulder or round (didn't have time to find veal; instead used mild italian sausage)
4 ounces/125g pork loin, trimmed of fat, or 4 ounces/125g mild Italian sausage (made without fennel)
8 ounces/250g beef skirt steak, hanging tender, or boneless chuck blade or chuck center cut (in order of preference)
1 ounce/30g thinly sliced Prosciutto di Parma
2/3 cup (5 ounces/160ml) dry red wine
1 &1/2 cups (12 ounces/375ml) chicken or beef stock (homemade if possible)
2 cups (16 ounces/500ml) milk
3 canned plum tomatoes, drained (I went with an entire can of plum tomatoes w. it's juices)
Salt and freshly ground black pepper to taste

Browning the Ragu Base:
Heat the olive oil in a 12 inch (30cm) skillet (frying pan) over medium-high heat. Have a large saucepan handy to use once browning is complete.

Add the pancetta and minced vegetables and sauté, stirring frequently with a wooden spoon, 10 minutes, or until the onions barely begin to color.

Coarsely grind all the meats together, including the prosciutto, in a food processor or meat grinder. Stir into the pan and slowly brown over medium heat.

First the meats will give off a liquid and turn dull grey but, as the liquid evaporates, browning will begin. Stir often, scooping under the meats with the wooden spatula. Protect the brown glaze forming on the bottom of the pan by turning the heat down. Cook 15 minutes, or until the meats are a deep brown.

Turn the contents of the skillet into a strainer and shake out the fat. Turn them into the saucepan and set over medium heat.

Reducing and Simmering:
Add the wine to the skillet, lowering the heat so the sauce bubbles quietly. Stir occasionally until the wine has reduced by half, about 3 minutes. Scrape up the brown glaze as the wine bubbles. Then pour the reduced wine into the saucepan and set the skillet aside.

Stir ½ cup stock into the saucepan and let it bubble slowly, 10 minutes, or until totally evaporated. Repeat with another ½ cup stock. Stir in the last 1/2 cup stock along with the milk. Adjust heat so the liquid bubbles very slowly. Partially cover the pot, and cook 1 hour. Stir frequently to check for sticking.

Add the tomatoes, crushing them as they go into the pot. Cook uncovered, at a very slow bubble for another 45 minutes, or until the sauce resembles a thick, meaty stew. Season with salt and pepper.

~~~~~~~~~~~~~~~~~~~~~~~~~~~

The March 2009 challenge is hosted by Mary of Beans and Caviar, Melinda of Melbourne Larder and Enza of Da Grande. We have chosen Lasagne of Emilia-Romagna from The Splendid Table by Lynne Rossetto Kasper as the challenge.

Tuesday, March 24, 2009

Cherry Berry Crumb Cake (TWD)

This week's Tuesdays With Dorie recipe, Blueberry Crumb Cake, was the perfect remedy for a lazy Sunday morning at our house this past weekend. It was definitely a "stay in my PJs and fuzzy slippers" kinda day, and this recipe started my morning on the right foot. With a miminal fuss to prepare, in no time you're rewarded with a delicious homemade treat with your morning cup o' joe and a Sunday paper (plus you have the intoxicating smell of something sweet and delicious baking in the oven permeating the house).

This easy to assemble breakfast cake is enhanced with a healthy amount of fruit and topped with walnut-studded crumb topping. It's also a very forgiving recipe, as you can vary the fruit, nut, zest and spices to work with what's available in your pantry.

Previously, I've used blueberries (fresh or frozen works equally well), as well as other fruit (pears, frozen raspberries) with this recipe, and experienced great results each time. This time around, I used Trader Joe's Very Cherry Berry Blend, which is a frozen medley of cherries, raspberries, blackberries, and blueberries. I always have a bag or two of this in my freezer, as it's a delicious mix-in for oatmeal or yogurt, and it makes for a fantastic filling for an impromptu crisp/cobbler.

For the most part, I followed the recipe as written and my notes are below:

- I didn't bother pulling out the food processor to make the crumbs, as it can easily be made by hand (and I didn't want to wash any more dishes -- yes, I'm working hard to keep the lazy morning theme).


- Instead of folding the fruit into the batter, I instead poured the batter into the pan, layered the fruit on top of the batter, then topped it with the crumbs. I think this layering approach helps to prevent all the fruit from sinking to the bottom.


- Perhaps it was due to the juiciness of fruit mix I used this time around, but I had to increase the baking time to 75 minutes (versus 55-65 minutes stated in the recipe). As expected, the cake was delicious! The cake was very moist, and I loved how the tart cherry/berry blend and sweet crunchy crumb topping played together.

Thanks Sihan of Befuddlement for selecting this keeper of a recipe! Make sure to visit the TWD blogroll to see everyone's delicious creations

Friday, March 20, 2009

Triple Lemon Chiffon Cake (TCS)

The Cake Slice bakers voted, and our selection for March is Triple Lemon Chiffon Cake. When I bake recipes out of the Sky High book, I can serve the finished cakes to an army of people, as most of the cakes in this book are beautiful, delicious and GINORMOUS! Well, that's not the case this time around. Surprise --- this is a triple layer baby cake:
The full recipe (see below), is enough to make a 9 inch triple layer cake. I had intended to cut the recipe in half and make my usual 6 inch cake. I didn't pay close attention to the instructions (too busy watching old episodes of Dexter and prepping this recipe --- I'm not an accomplished multi-tasker), and sprayed my 6 inch pans with non-stick cooking spray.

Non-stick is a huge no-no with chiffon cakes (and angel food), as the cake needs to "climb up" and stick to the sides of the pan while it bakes and cools to retain its shape. If you go the non-stick spray route, you will end up with a fallen, shrunken and mis-shapen cake (I'll spare you from my disaster).

I didn't notice my mistake until I had filled both pans with cake batter. I ended up retreiving some batter from the 6 inch pans and used two 4 inch springform pans (and yes, they were properly prepped).

Once the cake rounds cooled, I cut the cakes crosswise and slathered the curd and lemon cream between the layers:

Maybe I'm yearning for spring, but this cake really hit the spot for me. The chiffon cake and lemon cream frosting were both light and not overly sweet. This was fine by me, as the cake is punctuated by the terrific lemony tang and sweetness from the lemon curd.

{On a side note, I never realized what a FAT BOMB lemon curd is until I started making it from scratch. Until now, I thought it was just like jam --- the eggs and butter did me no favors}
Perfect portion control --- one slice = 3 bites:
If you love lemony desserts, this is cake is a must!!! Better yet, go get yourself a copy of Sky High: Irresistable Triple-Layer Cakes and bake this cake--- you won't regret it.

~~~~~~~~~~~~~~~~~~~~~~~~~~~~~~~~~~~

TRIPLE LEMON CHIFFON CAKE
adapted from: SKY HIGH - IRRESISTIBLE TRIPLE LAYER CAKES by Alisa Huntsman and Peter Wynne
makes a 9 inch triple layer cake

For the Cake

8 eggs, separated
1/4 cup walnut oil**
2 tablespoons freshly squeezed lemon juice
1 tablespoon of lemon zest
1/3 cup water
1/2 teaspoon of cream of tartar
1 and 1/2 cups of sugar
1 ans 3/4 cups of cake flour*
1/2 teaspoon of baking soda
1/2 teaspoon of salt
[*1 cup of cake flour is equal to 3/4 cup of AP flour plus 2 tablespoons of corn starch]
[**equal amount of either almond oil, hazelnut oil, or canola oil]
Preheat the oven to 350F degrees. Line the bottoms of three 9-inch pans with parchment paper but do not butter or grease the pans.

In a med-large bowl whisk together the egg yolks, oil, lemon juice, lemon zest, and water.

In the bowl of an electric mixer, whip the egg whites with the cream of tartar on medium speed until light and frothy. Slowly add 1/2 cup of sugar and continue to beat until soft peaks form.

Sift the flour, remaining sugar, baking soda , and salt into a large bowl. Whisk gently to combine.

Make a well in the center of the dry ingredients. Pour in the egg yolk mixture and mix to create
a smooth paste. Add one-fourth of the egg whites and fold in to lighten the batter. Fold in the remaining egg whites and divide the batter among the three pans.
Bake for about 16 minutes or until a cake tester comes out clean. Transfer to wire racks to cool in the pans. Once cool run a knife around the cake to in order to un-mold the cakes. Carefully pull off the parchment paper from the bottoms of the cakes.
To assemble the cake, place one layer on a cake stand. Top with a heaping 1/4 cup of lemon curd and spread it evenly. Repeat with the remaining layers. Frost the top of the cake and the sides with the lemon cream frosting.

Rich Lemon Curd
makes 1 cup

3 whole eggs
2 egg yolks
1/2 cup of sugar
1/2 cup plus 1 tablespoon of freshly squeezed lemon juice (about 4 lemons)
grated zest of three lemons
4 tablespoons of unsalted butter, at room temp.
Whisk together the whole eggs, yolks, sugar, lemon juice , and lemon zest together in a medium bowl. Transfer to a small non-reactive saucepan. Gently heat the mixture, whisking until it thickens enough to coat the back of a spoon. make sure not to boil the mixture. Pour the mixture through a sieve into a heatproof bowl. Stir in the butter and cover the curd with plastic making sure the plastic touches the curd. This should prevent a skin from forming on the curd. Refrigerate until cold. Then remove 3 tablespoons of curd and set it aside for the icing.

Lemon Cream Frosting
makes 3 1/4 cups

1 and 1/2 cups of heavy cream
2 tablespoons of sugar
3 tablespoon of lemon curd
Whip the cream and sugar in a large chilled bowl until stiff peaks form. Fold in the lemon curd, forming a stiff frosting.

Tuesday, March 17, 2009

French Yogurt Cake (TWD)

I was looking forward to making this week's Tuesdays With Dorie recipe, French Yogurt Cake w. Marmalade Glaze. I was soooo tempted to try the olive oil variation (w. citrus and herb flavors --- sounds so delicious), but stayed the course and stuck with the original version first.

With the exception of the glaze, I followed recipe instruction as exactly as written. As I didn't have any marmalade handy, I nixed the marmalade glaze and instead made a lemon syrup (1/4 C lemon juice, 1/4 C sugar - gently warm until the sugar melts) and brushed the top of the loaf as it was cooling.
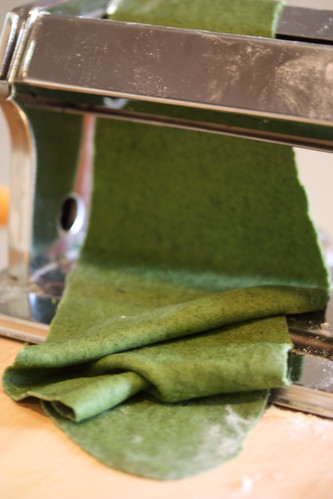
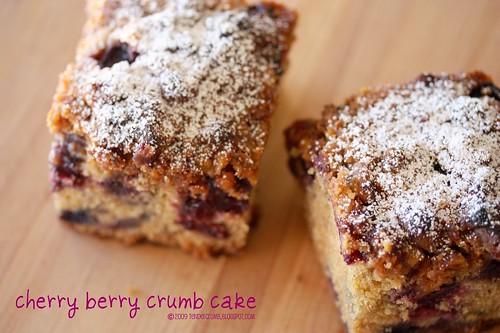
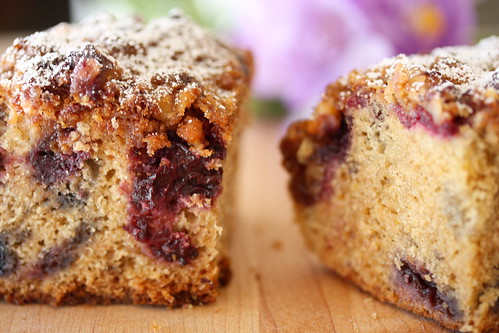
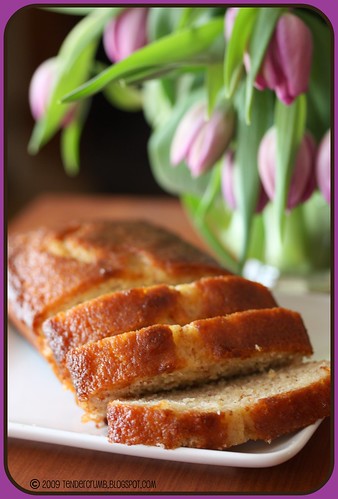
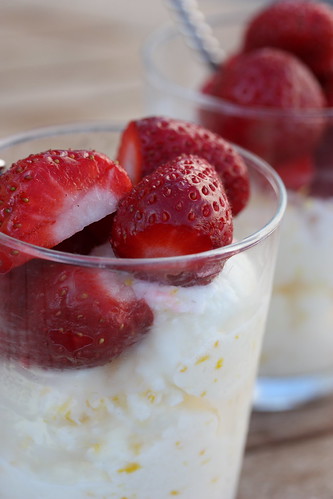
This cake is really wonderful and delicious on its own! I could tastle a sutble nutty flavor from the ground almonds, along with a terrific tart, tangy flavor from the lemon and yogurt. The lemon syrup also lent a nice tang and kept the cake moist.

Although I don't think you need to adorn this cake with anything else, Dorie Greenspan suggests serving this with some fruit and something creamy like creme fraiche. In my case, I had some lovely mini kiwis that needed some attention. This terrific find comes from Trader Joe's. These minis are the size of a kumquat and unlike it's full-sized cousin, you can pop these in your mouth and enjoy them, skin and all:
I also had some lemon cream leftover from a prior bake-a-thon:

With minimal fuss, this cake (with or without its accompaniaments) is a simple yet special treat. I typically dispatch my baked goods to my colleagues or my husband's work, but in this case I hoarded this cake all for myself ... should I feel guilty for not sharing?...naw!!!

Thanks to Liliana of My Cookbook Addiction for the delicious pick this week! Please visit Liliana's blog for the recipe, and make sure to check out the TWD blogroll to see how my fellow bakers fared.

Tuesday, March 10, 2009

Meyer Lemon Sherbet (TWD)


There was quite a bit of chatter among the Tuesdays With Dorie bakers regarding this week's recipe, Lemon Cup Custard. Some of the bakers commented that this custard tasted eggy and had a flan-like texure, and as a result, a lot of folks clearly expressed their love or hate of this type of dessert.

When it comes to dessert, I'm game for anything, except for anything flan-like. The texture is just not my cup of tea. So, where does that leave me this week?

Instead of sitting out this week, I wanted to take the ingredients called for in this recipe and create something that I would enjoy (hopefully the TWD gods won't strike me down for this). With a just a couple of tweaks (no eggs, no lemon extract, add lemon juice), I came up with this recipe for meyer lemon sherbet.

The hubby and I had the sherbet with fresh strawberries, all we could say was WOW! The meyer lemons imparted a nice citrusy/floral flavor and we loved the icy/creamy texture of the sherbet. One adjustment that I would make the next time is straining the mixture before freezing (the pieces of zest didn't do it for me texturally); otherwise, I wouldn't change a thing.
Check out how the others fared with the Lemon Cup Custard at the TWD blogroll! For the unadulterated version of this recipe, please visit our hostess for the week, Bridget of The Way The Cookie Crumbles.

~~~~~~~~~~~~~~~~~~~~~~~~~~~~~~~

Meyer Lemon Sherbet
makes approx 1 pint

2 C whole milk
1/2 C sugar
zest of 2 meyer lemons
1/2 C meyer lemon juice (approx 2-3 lemons)

In a medium saucepan, mix 1 C of milk with the sugar and zest. Heat until the sugar dissolves, stirring frequently.

Remove from the heat and add the remaining 1 C of milk. Transfer the mixture to a container and thoroughly chill in the fridge.

Once chilled, stir in the lemon juice into the milk mixture. Freeze in your ice cream maker according to the manufacturer's instructions.

Friday, March 6, 2009

The BAKED Bar

Lately, I've been really getting into the recipes of Baked: New Frontiers In Baking. I love how they've put their own modern spin to familiar, classic desserts, but even more I enjoyed reading about the authors' journey to create and perfect their recipes and to open their storefront --- it's a real inspiration to an aspiring bakery owner like me.

I've baked a few recipes out of the book including their famous brownies (which I previous posted on here), and so far every dessert has turned out wonderfully! If you have a passion for unfussy but delicious baking (myself included), this book is for you.
I was drawn to this bar recipe, as it had it had its namesake in the title (just like the BAKED Brownie)...if they're stamping their name on this recipe, it must be good, right?

Chock-full of chocolate chips, butterscotch chips, white chocolate chunks and walnuts that are enveloped in an obscene amount of sweetened condensed milk, this bar will send the biggest sweet tooth into sugar coma. Still, in small portions, this is a wonderful afternoon treat with a big cuppa joe... or with a big scoop of homemade vanilla ice cream!


~~~~~~~~~~~~~~~~~~~~~~
BAKED BARS
from Baked: New Frontiers In Baking by Matt Lewis and Renato Poliafito
makes 24 bars

For the crust:
2 C (about 6 oz) sweetened shredded coconut
2 1/2 C finely ground graham cracker crumbs (about 20 crackers)
1 C unsalted butter, melted

For the filling:
1 1/3 C walnut halves, toasted and chopped
1 1/2 C (9 oz) semi-sweet chocolate chips
3/4 C white chocolate coarsely chopped
3/4 C butterscotch chips
3 1/4 C (26 oz) sweetened condensed milk


Make the Baked Bar crust:
Preheat the oven t0 300 degrees F.

Butter the sides and bottom of a 9x13 inch baking pan or spray it with nonstick cooking spray (I lined my pan with foil before buttering- makes it easier to remove from the pan)

On a parchment-linedbaking sheet, spread out the coconut. Put the baking sheet inthe oven and toast the coconut until itstarts to turn golden brown, 7-10 minutes. Remove from th oven, toss the coconut, and return it to the oven for 3 more minutes.

Put the graham cracker crumbs in a large bowl, add the toasted coconut, and toss with your handsuntil combined. Add the butter. Use your hands to combine the mixture, then turn it out into the prepared pan. Using your hands, press the crust into an even layer on th bottom and up the sides of the pan. Use the bottom of a measuring cup to create a prefectly even crust.

Refreigerate the crust for 15 minutes, then bake for 10 minutes, or until golden brown. Transfer to a wire rack and let the crust cool completely.

Make the Baked Bar filling:
Increase the oven temperature to 325 degrees F.

Evenly spread the nuts in the bottom of the crust.

Spread the chocolate chips over the walnuts, followed by the white chocolate, followed by the buttersotch chips.

In a steady stream, pour the sweetened condensed milk evenlyover the filling. Shake the pan very gently to make sure the sweetened condensed milk is evenly distributed.

Bake for 30 to 40 minutes, roating the pan evey 10 minutes, until golden borwn and bubbly. Transfer to a wire rack and let cool completely. Cut into squares and serve.

Baked Bars will keep, wrapped tightly and at room temperature, for up to 4 days.

Tuesday, March 3, 2009

Chocolate Armagnac Cake - The Cake That Got Me (aka Ms Greenspan) Fired (TWD)

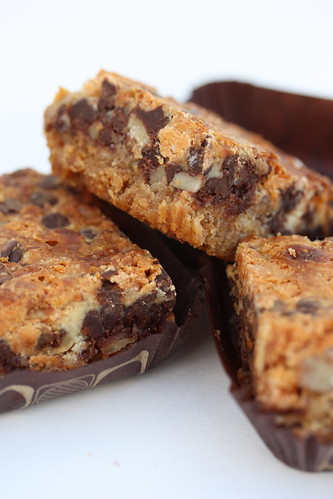
I'm going to apologize in advance for this really short post, as I'm just back from a three day wine tasting trek through the Central Coast (Paso Robles, Santa Barbara). Our wine fridge is now nicely stocked, and we're mentally rested and ready to face the rat race again.

LyB of And Then I Do The Dishes selected Chocolate Armagnac Cake as for this week's Tuesdays With Dorie. With the notoriety of this recipe (as noted in the title), I was eager to make this cake.
This decadent, almost flourless chocolate cake is made with ground pecans and armagnac-soaked (and flambeed) prunes. I dusted off the bottle of cognac I had on hand (mind you, I think we've had this bottle for 10 years --- I hope it doesn't have a limited shelf life), and it served as a respectable substitution for the armagnac.
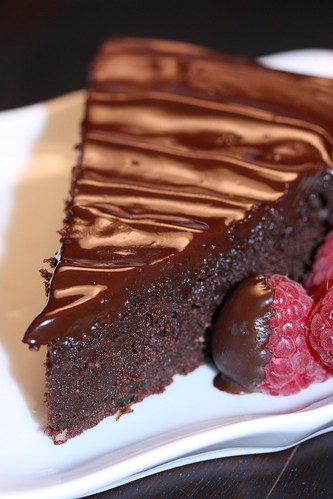
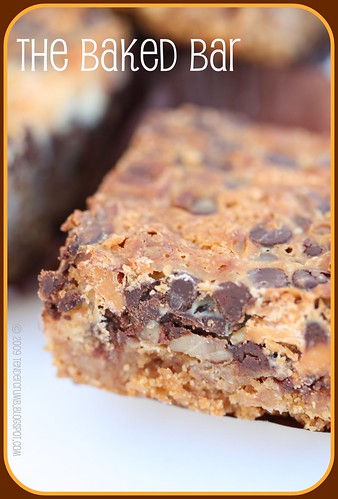
Of the chocolate cakes made recently (Chocolate Valentino, Devil's Food), I would have to say that this is my favorite.
Please visit LyB's delightful blog for the recipe, and visit the TWD blogroll to enjoy the creations of my fellow TWD bakers.
Blog Widget by LinkWithin